How to increase graveyard quality in Graveyard Keeper 2
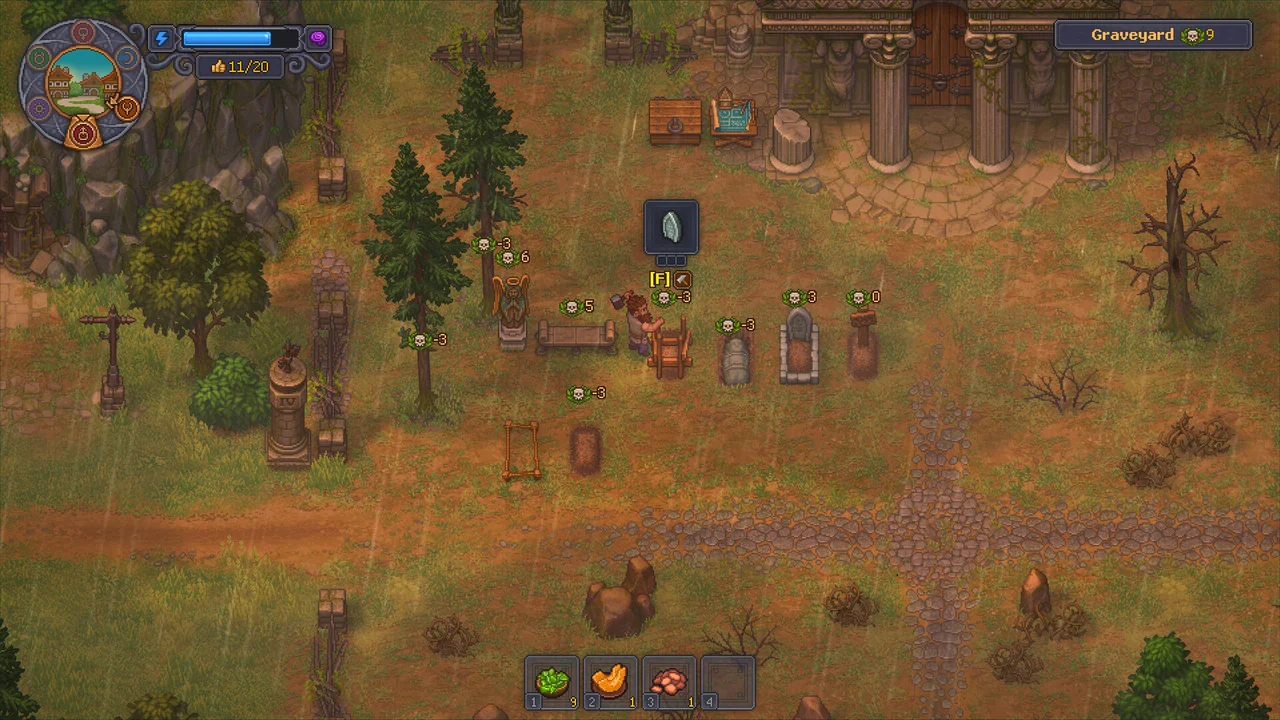
A grave scores its decorations minus red skulls, capped by white skulls. Fix the body and the stone together, and stop open pits from dragging the total down.
The short answer
Each grave scores its headstone plus its fence, minus the body’s red skulls, and the result can never go above the body’s white skulls. Graveyard quality is the sum of all your finished graves plus benches, minus 3 for every open pit or grave with a body still lying in it. So raise white skulls, remove red ones, and only then buy better stone.
 VIEW IMAGE ↗
What to check, in order
- 01
Before burying, read the body’s red and white skulls at the Autopsy Table.
- 02
Empty the Fat and Blood from its pockets; they carry red skulls.
- 03
Use embalming solutions to add white skulls if the body caps your grave.
- 04
Dig, bury and fill the grave on the same day; open pits cost 3 points each.
- 05
Add the best headstone and fence you can afford, then check the grave’s score.
- 06
Place Exterior Benches inside the grave area for an easy +3 each.
Three parts of a grave score
- 01
White skulls
The positive ceiling
- 02
Red skulls
Reduce decoration value
- 03
Grave decoration
Cross and fence quality
- 04
Grave score
Limited by the body
Field Guide schematic · read alongside the checklist. Not an in-game screen.
The formula
Grave quality = min(headstone + fence − red skulls, white skulls). Read it in two parts. The decorations give you a score, red skulls knock it down one point each, and the body’s white skulls put a hard ceiling on the result.
That ceiling is why a Marble Cross on a poor body is wasted money. If the body has 3 white skulls, the grave can never be worth more than 3, whatever you put on top. Equally, a great body under a Wooden Sign scores 1. Both halves have to improve together.
| Grave | Headstone + fence | Red skulls | White skulls | Score |
|---|---|---|---|---|
| Starter body, Wooden Cross I + Wooden Fence I | 3 | 1 | 4 | 2 |
| Same body, Gravestone II + Stone Fence II | 9 | 1 | 4 | 4 (capped) |
| Embalmed body, Gravestone II + Stone Fence II | 9 | 0 | 12 | 9 |
Headstones and fences
Every grave has a top slot for the headstone and a bottom slot for the fence. Their values simply add. You begin with three Wooden Signs in the graveyard chest, and more signs cost 2 Boards and 2 Sticks at Woodworking Workbench I. The perfect grave pairs Marble Cross II with Marble Fence II for 14.
| Headstone | Value | Fence | Value |
|---|---|---|---|
| Wooden Sign | 1 | Wooden Fence I | 1 |
| Wooden Cross I | 2 | Wooden Fence II | 2 |
| Wooden Cross II | 3 | Stone Fence I | 3 |
| Gravestone I | 4 | Stone Fence II | 4 |
| Gravestone II | 5 | Marble Fence I | 5 |
| Marble Cross I | 6 | Marble Fence II | 7 |
| Marble Cross II | 7 |
Fixing the body first
Start with the pockets. Fat and Blood in a corpse’s pockets carry red skulls, and emptying them is free, cannot fail, needs no mastery and pays a blue technology point each time. For a grave that is pure profit.
Embalming is the cheap way to raise the white ceiling. Solution for Corpses, made at the Formulation Bench from Melted Fat and a Preservative once you have Embalming I, adds 1, 2 or 3 white skulls depending on its star grade. Injection for Corpses, from Embalming III, also strips 1 to 3 red skulls; it needs Comet’s Tail, which Gunter sells.
Removing organs is a blunter tool. Taking a part out removes its skulls whether they help or hurt, and a bad result leaves a Surgeon’s Error worth −1 red and −1 white forever. For graves, solutions beat surgery almost every time.
Field note: A first-tier body with emptied pockets plus three or four top-grade Solutions reaches 0 red and 14 or more white, enough for a perfect 14-point grave.
What bodies start with
Bodies come in tiers, and the tier tells you roughly what you are working with before you even open the Autopsy Table. The numbers below are after the pockets are emptied. Early bodies are actually friendly to graves: low red, a few white, and cheap to top up with a solution or two.
Later bodies carry more of both. They make better graves once embalmed, but they also make better zombies, since every red skull is a talent slot. Decide which job a body is for before you start cutting.
| Body tier | Red skulls | White skulls |
|---|---|---|
| Tier 1 | 0 to 1 | 2 to 5 |
| Tier 2 | 1 to 5 | 3 to 5 |
| Tier 3 | 2 to 6 | 4 to 6 |
| Tier 4 | 3 to 7 | 4 to 7 |
How the graveyard total adds up
Graveyard quality is the sum of every filled grave, plus extras such as Exterior Bench I at 3 points each. Only things placed inside a Grave Area count. The penalties are just as important: each open pit, and each grave with a body still lying in it, is worth −3.
So never leave a hole overnight. Dig, bury and fill in one go. Digging and filling each pay 2 red technology points and each swing adds a little insanity, 0.2 per swing, so plan the job for a time when your energy bar is healthy.
Grave Expectations and other targets
Herbert’s quest Grave Expectations asks for graveyard quality 10. The cheap route is four graves at 2 points each with Wooden Crosses plus one Exterior Bench for 3. Any equivalent mix works, but every grave counts, so do not skimp on the last one.
Later, quality pays for itself. Successful sermons add 5 to 30 bronze per point of graveyard quality depending on the prayer, and the Home Sweet Tomb achievement waits at quality 200.
| Expansion | Cost at the Blueprint Desk | Unlocked by |
|---|---|---|
| Expand I | 12 Piece of stone | Certificate, Please |
| Expand II | 12 Polished Stone | Expand I |
| Expand III | 24 Polished Stone | Expand II |
Bury, cremate or dump?
Not every body deserves a plot. Cremation turns a corpse into 5 Ash and 1 Salt and pays 1 red and 2 blue technology points, but adds nothing to graveyard quality. River dumping is the quickest way to free space. Burial is the only option that raises quality and the only one that pays a Burial Certificate, which Januarius buys for a silver and a point of happiness.
A sensible split: bury bodies you can turn into good graves, cremate the rest for Ash, and keep the river for emergencies when the morgue is full and the donkey is due. Bodies left lying about vanish after 75 real minutes out of view and give you nothing.
Common questions
Does every decoration upgrade raise the score?+
Only when decorations are the limiting factor. If white skulls cap the grave, upgrade the body instead.
Can a grave score below zero?+
Yes. Red skulls subtract one each, so a heavily red body under a Wooden Sign can go negative.
Do open graves hurt quality?+
Yes, every open pit or grave with an unburied body is −3. Finish each grave the same day.
Does cremation help graveyard quality?+
No. It pays Ash, Salt and technology points but contributes nothing to quality.
Do benches count?+
Exterior Bench I adds 3 points, but only when placed inside a Grave Area.
What is the highest possible grave score?+
14, from Marble Cross II (7) and Marble Fence II (7) on a body with 0 red and at least 14 white skulls.
Should I remove organs to improve a grave?+
Rarely. Removing a part takes its skulls with it, good and bad, and a failed cut leaves a permanent Surgeon’s Error. Embalming solutions are cheaper and safer.
Sources & further reading
Recipes, costs and timings were cross-checked against the references below and the official patch notes. Numbers can shift with updates, so the in-game recipe window always has the final word.
- Community databaseGK2DB: graveyard
- Community databaseGK2DB: corpses and organs (embalming)
- Community guideGK2DB: your first week
- Community FAQWikily: graveyard expansions and quality payouts
- Guidegames.gg: autopsy guide